On the Road with the Electric Powered Cycle Camper
This trip was in cool temperatures with cloud cover. A contrast from the full sun, hot conditions of the maiden journey. We took a different route also. We traveled along the Old Carp Road to the village of Carp. The journey along the Carp Escarpment was spectacular.
I arrived to the campsite with about 25% remaining on the battery. And to add some challenge to the weekend, I forgot to bring the battery charger so I was entirely dependent on the solar panel for the return trip. This was ok though because I wanted to test out driving without using the hub motor. I’m happy to report that the Electric powered cycle camper trailer rides well under pedal power alone. I used the power occasionally to get a break and on up hill stints. With only solar to charge the battery, I managed to complete the entire 50 KM ride back to Ottawa. I never ran out of power.
I also added a rechargeable electric fan to the cabin of the camper for this over-nighter. It worked nicely to keep the cabin cool and refreshed throughout the night.
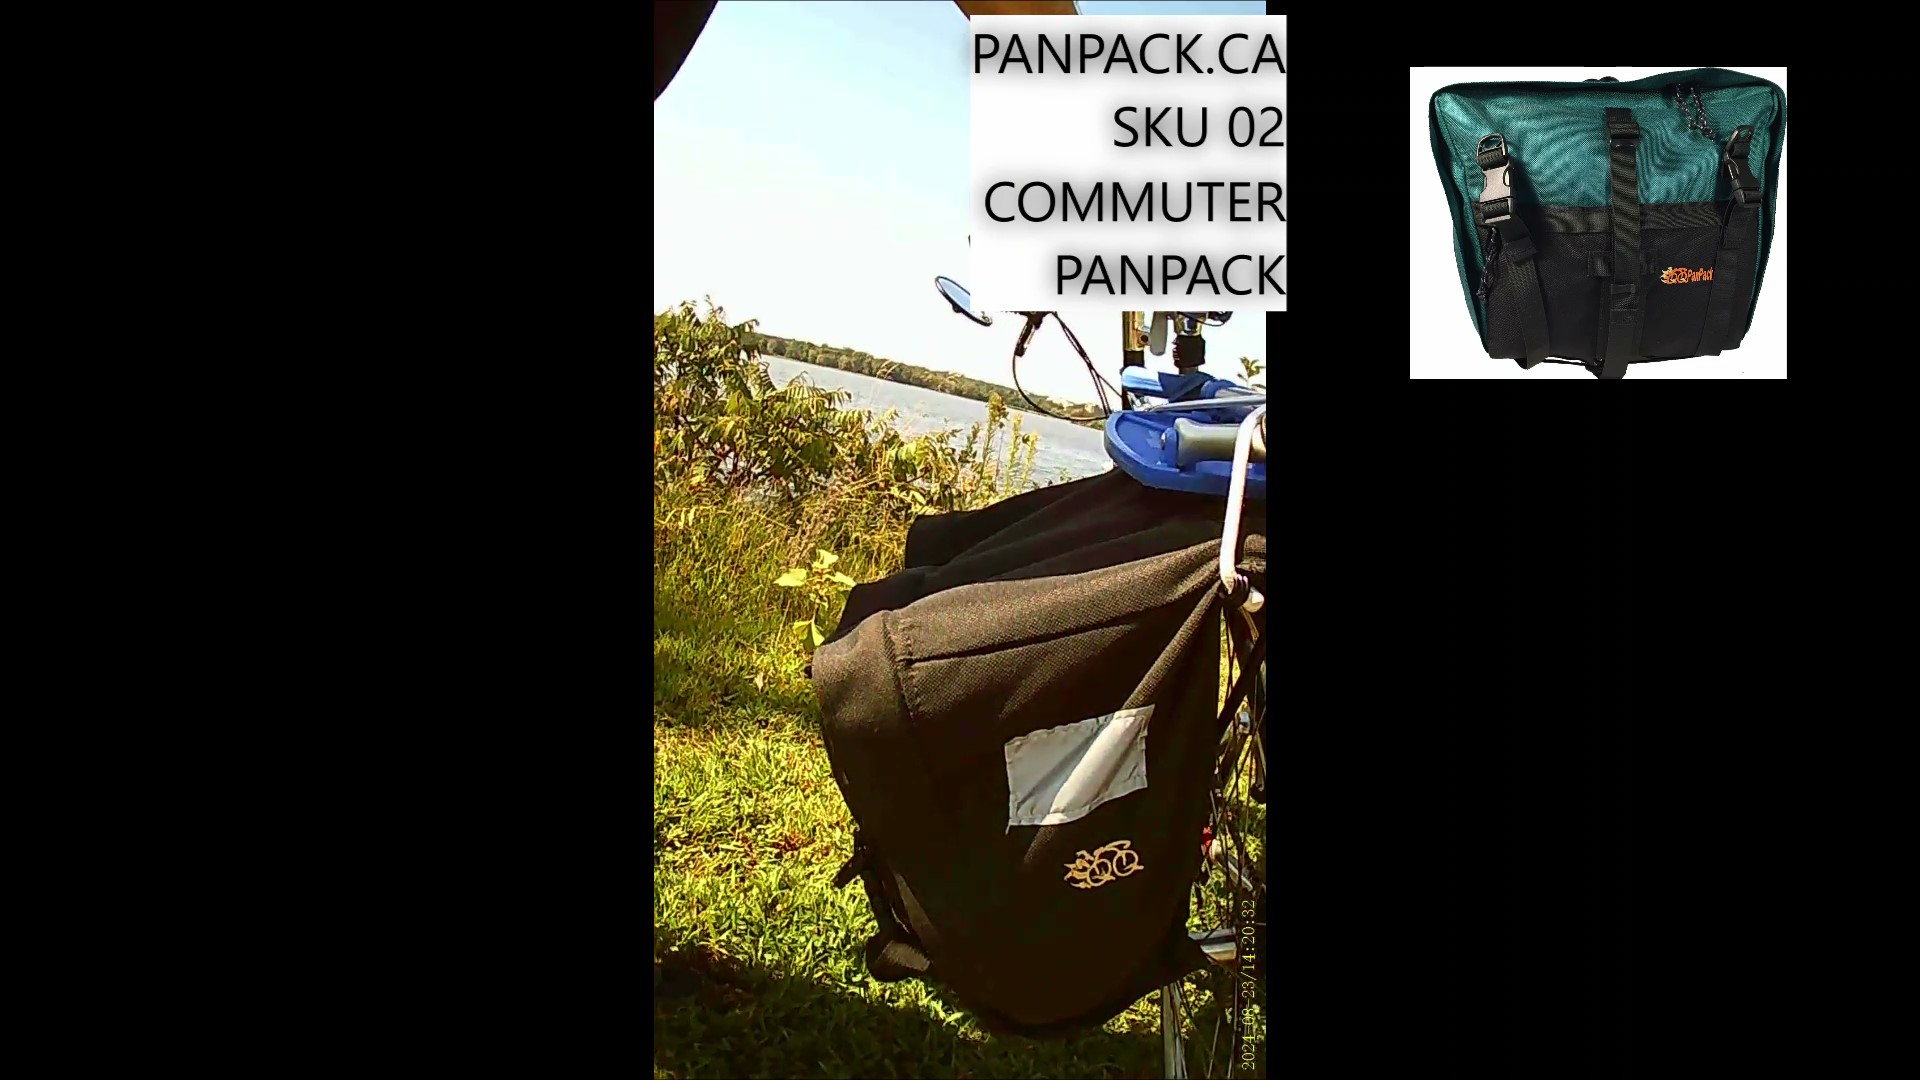
Similar to the maiden journey I carried my cloths and essential in the Commuter PanPack attached to the rear rack of my bike. Shout out again to Mark B. who cycled up with all of his gear and tent packed in the World Tour PanPack. Great work on the camera too.
Overall an outstanding weekend tour, I cant wait for the next one!
Here are some photos from our maiden adventure with the cycle camper. We went on a 50 KM ride from Ottawa to Fitzroy Provincial Park in the sun and 35 degree C temps. The electric hub motor came in very handy for the uphill stints and with the head wind. The battery lasted the entire trip and had plenty remaining after arriving to the campsite. The solar panel kept it charged up very well along the way due to the full sun conditions.
At the campsite with our cycle camper trailer, setting up the camper was super easy. Found a relatively level spot and lowered each of the 4 legs. Making fine height adjustments with the leveling bolts as required. Next I opened the lid of the cargo carrier and fixed the hinges in the open position. I added 2 props on each end to remove any flex in the hinge. Then pulled out the end fly’s and pegged them down. Finally I inserted the pole into the awning and snapped it to the lid of the cargo carrier. The awning comes with chords that loop into the same pegs for the end fly’s so its really quick. Plenty of time to sit down and enjoy a well deserved cold beverage before dinner.
I carried the Commuter PanPack on the rear rack of my bike. I packed my cloths in the commuter panpack. All other gear was stored in the cargo space below the carrier. This included, chairs, food, cooking equipment, emergency kit, tool kit and most importantly cold drinks.
I woke up refreshed from a very comfortable sleep, despite the massive downpour and thunderstorm that rolled in overnight. All in all an excellent weekend camping!
Shout out to Mark B. ! Mark made the trip without the electric motor assist. He also arrived sporting a cool lightweight tent that was quick to set up and take down.
Bike Camper instructional manual
Make your own Cycle Camper. Convert your cargo carrier into a bike camper with this instructional guide manual by Brule Adventure Gear. A step by step guide detailing how we converted our cargo carrier into the electric powered, solar cycle camper.
The manual is available in a downloadable pdf format. It also comes with 50 high-resolution color photos. These include detailed descriptions documenting the process. You decide how many features you need in your cycle camper. You can choose the basic bike camper. Alternatively, you can add the solar panel, re-charging station, or electric hub motor. It’s up to you.
Visit us at www.panpack.ca for details and to order the downloadable guide manual.
How to Convert your Cargo Carrier into a Bike Camper (Pat. pend.)! Now available this manual takes you step by step through the process of converting your cargo carrier into an electric powered, solar re-chargeable Cycle Camper.
The manual is available in a downloadable pdf format. It comes with 50 high-resolution color photos, step by step assembly instructions and detailed scale drawings of the frame make up and assembly. These include detailed descriptions documenting the process. You decide how many features you want in your cycle camper. You can choose the basic bike camper. Alternatively, you can add the solar panel, re-charging station, or electric hub motor. It’s up to you.
Bike Camper instructional manual
Bike, Store, Camp with the Cycle Camper. Now convert your own cargo carrier into a bike camper with this instructional guide manual by Brule Adventure Gear. A step by step guide detailing how we converted our cargo carrier into the electric powered, solar cycle camper.
The manual is available in a downloadable pdf format. It also comes with 50 high-resolution color photos. These include detailed descriptions documenting the process. You decide how many features you need in your cycle camper. You can choose the basic bike camper. Alternatively, you can add the solar panel, re-charging station, or electric hub motor. It’s up to you.
Visit us at www.panpack.ca for details and to order the downloadable guide manual.
I came across a string of posts recently that was suggesting preference for a 60% front wheel to 40% rear wheel pannier weight distribution. This might work under some conditions, such as on straight even terrain with no turns. But when it comes to bike braking stability, it’s not the best distribution under braking and here’s why.
Under braking, ideally you want to achieve 50% of the load at the front and 50% over the rear wheel. This distribution is more stable and should result in uniform wear of brake components and tires. Equal load on each wheel both maximizes grip around turns and helps control under braking.
50/50 Front to Rear wheel load distribution under braking:
To achieve this 50/50 weight distribution under braking the front panniers should weigh less than the rear panniers. This is because when you brake, the dynamic load affect increases the reaction at the front wheel while reducing the reaction on the rear wheel. You have probably observed this process many times. Like on the road when a car stops and the front of the vehicle drops while the rear of the vehicle raises up.
There is a bit of guess work and some physics involved to understand what the ratio of front pannier to rear pannier weight should be. It will depend on the total weight of your panniers; the wheel spacing and the height of your panniers center of gravity above the road.
Physics behind the weight distribution
The schematic free body diagram below shows the pannier forces in play that will impact the weight distribution on your wheels while braking.
R1 and R2 represent the wheel reactions and while the sum of R1 + R2 will remain the same under braking. The value of each will change depending on: the weight of each bag; the dimensions X and Y and how quickly the bike stops (A).
Each bike will be slightly different in set up but values for X and Y can be easily measured. Some guesswork is involved for the value of A though. If your goal is to encourage even wear and tear on your breaks and tires, than an average value of A should be used. Lets assume this would be a value of 0.5g (or half the acceleration due to gravity).
Calculations and Equations:
Remember the goal is to find the weight distribution between front and rear panniers that will result in equal load on the front and rear wheels under braking. So we want to have R1= R2 under braking
On average a bikes wheel base (X) is around 1 M and the average height (Y) is 0.5 M. So with this information we can calculate a ratio of front to rear panniers as follows:
EQUATIONS: X=0.5Y ; R2=R1 ; H1=.5W1 ; H2=0.5W2;
Plugging these values into the equations 1 and 2 above, we can solve for R1 and R2 in relation to W1 and W2:
W2-(.5W1+.5W2)*0.5=W1+(.5W1+.5W2)*0.5
W2-0.25W1-0.25W2=W1+0.25W1+0.25W2
.5W2=1.5W1
W2=3W1
Findings and Conclusions:
So the total pannier weight is W1+3W1 = 4W1 and the ratio of total weight front / back would be 1/4 front and 3/4 rear. In terms of percentages this works out to 25% on the front panniers and 75% in rear panniers.
Of course as noted earlier in the post, every set up will be different and will depend on your goal in the long term. For example if you prefer to have more control / stability under braking, you may consider a weight distribution that results in the front wheel reaction being less than the rear wheel reaction under braking. In this case, you could lower the center of gravity of the panniers or get a bike with a wider wheel base. You could also consider to lighten the weight of the front panniers.
Regardless the goal (component wear or increase stability control under braking), both can be achieved by a weight distribution that places more load over the rear wheel than the front wheel.
With the cycle camper, the electric hub motor gets you to the campsite before dark. Setting up camp is a breeze. Simply open the lid, drop down the legs, peg down the tent fly and get in. Inside your treated to cozy hard top raised camper with USB charging station and handy lighting system. The solar panel keeps your battery charged even at sites with no power. The foam mattress ensures you wake fresh and ready for the next ride.
Trailer frame features all bolted connections for quick disassembly. Transport everything in the cargo carrier!
Comfortable foam mattress with removable nylon covering
Removable Nylon tent enclosure is fixed to Cargo carrier with Velcro
Electric Hub wheel ensures you arrive to the campsite before dark!
Rechargeable lithium battery
Removable Solar panel charges the battery in 3 hours with full sun.
USB charging station will keep your phone, tablet and computer charged at all times.
interior cabin lighting
additional storage underneath.
Quick release electric cables and trailer hitch
Stable lockable legs for secure camping in all conditions.
External nylon fly for exterior lounging on those rainy days at camp.
Spacious comfortable interiorremovable solar panelSolar panel electric controllerSet up for camp external flyElectric Hub motorOn the road with The Cycle Camper (pat. pend.)
Subscribe
Subscribe to get updates on this and all of Brule Adventure Gear new product offerings and upcoming sales. Enter your email below to receive updates.
I recently noticed several posts. They suggested a preference for a 60% front wheel to 40% rear wheel pannier weight distribution. This might work under some conditions, such as on straight even terrain with no turns. But its not the best distribution under braking and here’s why.
Under braking, ideally you want to achieve 50% of the load at the front and 50% over the rear wheel. This distribution is more stable and should result in uniform wear of brake components and tires. Equal load on each wheel both maximizes grip around turns and helps control under braking.
50/50 Front to Rear wheel load distribution under braking:
To achieve this 50/50 weight distribution under braking the front panniers should weigh less than the rear panniers. When you brake, the dynamic load affect increases the reaction at the front wheel. At the same time, it reduces the reaction on the rear wheel. You have probably observed this process many times. You can notice it on the road. When a car stops, the front of the vehicle drops. Meanwhile, the rear of the vehicle raises up.
There is guess work involved. Some physics is also necessary to understand what the ratio of front pannier to rear pannier weight should be. It will depend on the total weight of your panniers. It will also depend on the wheel spacing and the height of your pannier’s center of gravity above the road.
Physics behind the weight distribution
The schematic free body diagram below shows the pannier forces in play. These forces will impact the weight distribution on your wheels while braking.
R1 and R2 represent the wheel reactions. The sum of R1 + R2 will remain the same under braking. The value of each will change depending on the weight of each bag. They will also depend on the dimensions X and Y. Additionally, how quickly the bike stops (A) will affect their value.
Each bike will be slightly different in set up but values for X and Y can be easily measured. Some guesswork is involved for the value of A though. To encourage even wear and tear on your brakes and tires, use an average value of A. Let’s assume this would be a value of 0.5g (or half the acceleration due to gravity).
Calculations and Equations:
The goal is to find the weight distribution between front and rear panniers. This will result in equal load on the front and rear wheels under braking. So we want to have R1= R2 under braking
On average a bikes wheel base (X) is around 1 M and the average height (Y) is 0.5 M. So with this information we can calculate a ratio of front to rear panniers as follows:
EQUATIONS: X=0.5Y ; R2=R1 ; H1=.5W1 ; H2=0.5W2;
Plugging these values into the equations 1 and 2 above, we can solve for R1 and R2 in relation to W1 and W2:
W2-(.5W1+.5W2)*0.5=W1+(.5W1+.5W2)*0.5
W2-0.25W1-0.25W2=W1+0.25W1+0.25W2
.5W2=1.5W1
W2=3W1
Findings and Conclusions:
The total pannier weight is W1+3W1, which equals 4W1. The ratio of total weight is 1/4 at the front and 3/4 at the rear. In terms of percentages this works out to 25% on the front panniers and 75% in rear panniers.
Every set up will be different. It will depend on your goal in the long term, as noted earlier in the post. For example, if you prefer to have more control or stability under braking, consider adjusting the weight distribution. This adjustment should result in the front wheel reaction being less than the rear wheel reaction during braking. In this case, you lower the center of gravity of the panniers. Alternatively, get a bike with a wider wheel base. Also consider to lighten the weight of the front panniers.
Regardless of the goal, whether part wear or increased stability control under braking, both can be achieved. This is possible by distributing weight to place more load over the rear wheel than the front wheel.
This video takes you on a bike ride through the streets of Ottawa. We bike from Westboro down to the Ottawa river. The route weaves through paved and rough streets; along bike paths and traverses bumpy terrain.
Attached to the rear rack of the bike is the Commuter PanPack. This is a convertible bike pannier bag backpack created and manufactured by Brule Adventure Gear.
Along the way, you’ll hear some tour guide descriptions. You’ll also gain interesting insights into the amazing features offered by the Commuter PanPack.
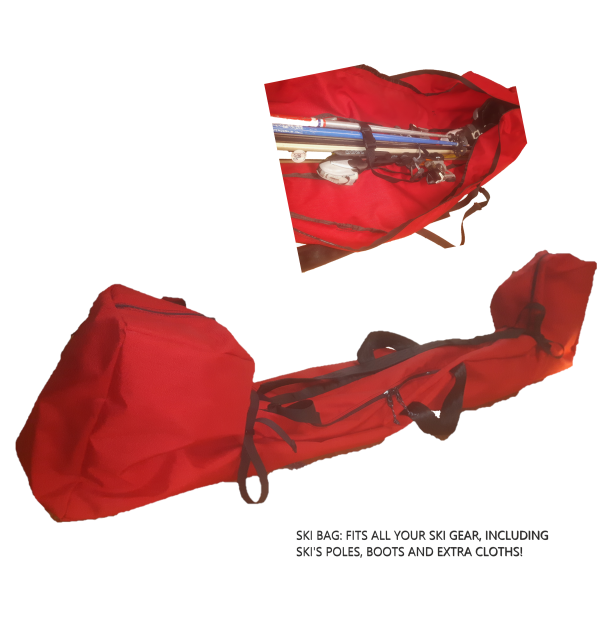
Now you can carry your ski’s and your boots in tone ski bag!
This joint ski / ski boot bag will also fit poles and some extra cloth’s. Furthermore on airline flights you can pack 2 full sets of ski’s and boots. Constructed of sturdy Cordura nylon fabric, nylon straps and features YKK nylon coil zippers with metal pulls.
Here is an instructional video showing the ski bag being packed with ski’s and boots. This unique Ski bag is manufactured by Brule Adventure Gear, Visit panpack.ca for details and to order
Ever have to carry ski’s boots poles and all your hats, mitts ski helmet separately? Taking all your gear from the resort parking lot to the ski hill can be a juggling act or involve multiple trips. Not with this new ski and boot pack by Brule Adventure Gear
This pack by Brule Adventure Gear will end the awkward walk to the slopes! A unique product to carry your ski’s, poles, helmet extra warm cloths and your ski boots all in one brilliant case! Your ski boots fit easily and securely on each end as seen in the photo. They are firmly held from shifting with handy hold down straps. Keep everything in place for easy transport. 2023-2024.
Its also perfect for air travel, keeping all your equipment together in one place for the trip.
If you have ever cycle toured with gear before, you’ll understand the importance of weight positioning on bike stability. This is most evident when your stopped at a light struggling to keep the bike upright before kicking off again. Or when trying to keep the bike on track when navigating a narrow winding trail at low speeds.
Effects of Side Panniers on stability
As a structural engineer, I understand that how you pack and position your gear affects bike stability. One way to increase stability is to place gear weight evenly on both sides of the bike. Another way is to get the weight as low to the ground as you can. The lower the weight the more stable the bike.
The reason for this is that placing weight higher increases the horizontal lever arm. This occurs as the bike rotates or leans over. And this lever arms impacts the overturning moment (Mot) and the overall stability.
To help understand how this works, see the schematic free body diagram of a bike with rectangular side panniers. The diagram below shows the forces in play.
Sketch showing side panniers and forces in play
Schematic showing how panniers affect bike stability
The overturning “moment” is equal to the weight (F) times the distance (d). When the distance d increases the moment also increases. The overturning moment for a bike acts about the point where the wheels touch the ground. This is indicated as point A on the sketch.
In the balanced vertical condition, the sum of the overturning moments about A is equal to zero (Mot=0). Here, each side panniers must weigh the same. The distances d1 and d2 must also be the same. If these conditions are met, the overturning from one pannier will counteract the other.
But as the bike leans over, the overturning moment Mot about A increases. This increase in moment is equal to the weight of the pannier “F.” It is multiplied by the horizontal distance. This is the distance that the center of gravity “cg” of the pannier is away from “A.” Refer to distance “d1” and “d2” in the sketch. You can see that in the leaned position, d1 has decreased and d2 has increased. The net difference between d2 and d1 multiplied by the weight F equals the net overturning moment about A.
Keep the “cg” of your gear as low as possible in the side panniers. This helps to reduce the difference between d1 and d2 as the bike leans. It reduces the overturning moment. This can be achieved by packing heavier gear (food, water, tools etc.), low in the side panniers.
Adding a Rack pack or Bar Rack for bike packing
Now if you add a high rack pack, the impact of its weight on stability can be dramatic. Adding a cantilevered bar rack will also impact stability significantly. In the sketch below, the offset distance d3 increases. This happens as the (cg) of this pack is located higher above point A. In addition, when the bike leans, the overturning moment increases. This is because there is no counter weight associated with this pack.
Sketch showing Rack pack / bar rack added to touring set up.
bike stability sketch when touring with panniers and bar bags added
So to minimize the impact on overall bike stability, keep the weight of these packs low. It’s important to keep the weight of these packs to a minimum.
In summary, the following considerations are key to minimizing the affects on stability of a bike touring set up :
keep heavier items as low as possible in side panniers
If a bar or rack pack is important to your setup, position them as low as possible on the bike. Keep them lightly loaded.
Maintain a balanced weight for each of the side panniers.
To provide the best experiences, we use technologies like cookies to store and/or access device information. Consenting to these technologies will allow us to process data such as browsing behavior or unique IDs on this site. Not consenting or withdrawing consent, may adversely affect certain features and functions.
Functional
Always active
The technical storage or access is strictly necessary for the legitimate purpose of enabling the use of a specific service explicitly requested by the subscriber or user, or for the sole purpose of carrying out the transmission of a communication over an electronic communications network.
Preferences
The technical storage or access is necessary for the legitimate purpose of storing preferences that are not requested by the subscriber or user.
Statistics
The technical storage or access that is used exclusively for statistical purposes.The technical storage or access that is used exclusively for anonymous statistical purposes. Without a subpoena, voluntary compliance on the part of your Internet Service Provider, or additional records from a third party, information stored or retrieved for this purpose alone cannot usually be used to identify you.
Marketing
The technical storage or access is required to create user profiles to send advertising, or to track the user on a website or across several websites for similar marketing purposes.


